Centmin Mod:how to add new Domain/Subdomain Account
Method 1:
Use SSH command line:
nv -d tutorialspots.com -s y -u tutorialspots
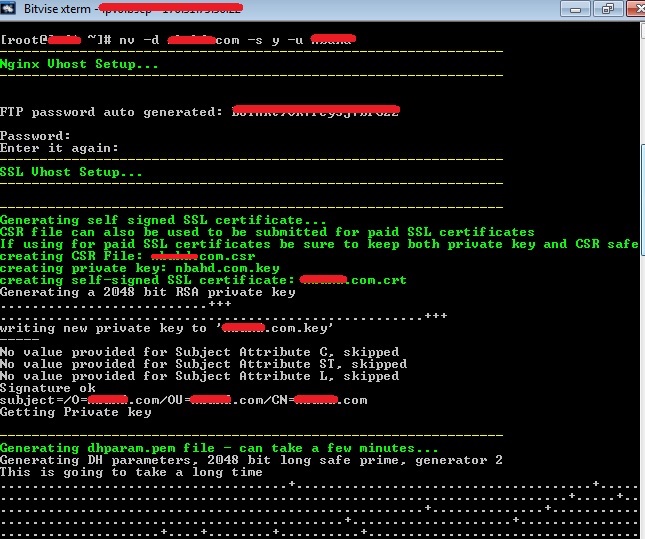
Output:
[root@tutorialspots ~]# nv -d tutorialspots.com -s y -u tutorialspots
---------------------------------------------------------------
Nginx Vhost Setup...
---------------------------------------------------------------


FTP password auto generated: xxxxxxxxxxxxxxxxxxxxxx

Password:
Enter it again:
---------------------------------------------------------------
SSL Vhost Setup...
---------------------------------------------------------------

---------------------------------------------------------------
Generating self signed SSL certificate...
CSR file can also be used to be submitted for paid SSL certificates
If using for paid SSL certificates be sure to keep both private key and CSR safe
creating CSR File: tutorialspots.com.csr
creating private key: tutorialspots.com.key
creating self-signed SSL certificate: tutorialspots.com.crt
Generating a 2048 bit RSA private key
..........................+++
.....................................................+++
writing new private key to 'tutorialspots.com.key'
-----
No value provided for Subject Attribute C, skipped
No value provided for Subject Attribute ST, skipped
No value provided for Subject Attribute L, skipped
Signature ok
subject=/O=tutorialspots.com/OU=tutorialspots.com/CN=tutorialspots.com
Getting Private key

---------------------------------------------------------------
Generating dhparam.pem file - can take a few minutes...
Generating DH parameters, 2048 bit long safe prime, generator 2
This is going to take a long time
................
dhparam file generation time: 163.483973507

-------------------------------------------------------------
nginx: the configuration file /usr/local/nginx/conf/nginx.conf syntax is ok
nginx: configuration file /usr/local/nginx/conf/nginx.conf test is successful
Stopping nginx:                                            [  OK  ]
Starting nginx:                                            [  OK  ]
service pure-ftpd restart

-------------------------------------------------------------
FTP hostname : xx.xx.xx.xx
FTP port : 21
FTP mode : FTP (explicit SSL)
FTP Passive (PASV) : ensure is checked/enabled
FTP username created for tutorialspots.com : tutorialspots
FTP password created for tutorialspots.com : xxxxxxxxxxxxxxxxxxx
-------------------------------------------------------------
vhost for tutorialspots.com created successfully

domain: http://tutorialspots.com
vhost conf file for tutorialspots.com created: /usr/local/nginx/conf/conf.d/tutorialspots.com.co
nf

vhost ssl for tutorialspots.com created successfully

domain: https://tutorialspots.com
vhost ssl conf file for tutorialspots.com created: /usr/local/nginx/conf/conf.d/tutorialspots.co
m.ssl.conf
/usr/local/nginx/conf/ssl_include.conf created
Self-signed SSL Certificate: /usr/local/nginx/conf/ssl/tutorialspots.com/tutorialspots.com.crt
SSL Private Key: /usr/local/nginx/conf/ssl/tutorialspots.com/tutorialspots.com.key
SSL CSR File: /usr/local/nginx/conf/ssl/tutorialspots.com/tutorialspots.com.csr

upload files to /home/nginx/domains/tutorialspots.com/public
vhost log files directory is /home/nginx/domains/tutorialspots.com/log

-------------------------------------------------------------
Current vhost listing at: /usr/local/nginx/conf/conf.d/


Nov 5   18:03   845    ssl.conf
Nov 5   18:03   1.1K   demodomain.com.conf
Nov 5   18:03   1.6K   virtual.conf
Nov 5   18:33   1.5K   xxx.biz.conf
Nov 7   18:27   3.2K   tutorialspots.com.ssl.conf
Nov 7   18:27   1.5K   tutorialspots.com.conf

-------------------------------------------------------------
Current vhost ssl files listing at: /usr/local/nginx/conf/ssl/tutorialspots.com


Nov 7   18:25   1.7K   tutorialspots.com.key
Nov 7   18:25   944    tutorialspots.com.csr
Nov 7   18:25   1.1K   tutorialspots.com.crt
Nov 7   18:27   424    dhparam.pem

-------------------------------------------------------------
Commands to remove tutorialspots.com

 rm -rf /usr/local/nginx/conf/conf.d/tutorialspots.com.conf
 rm -rf /usr/local/nginx/conf/conf.d/tutorialspots.com.ssl.conf
 rm -rf /usr/local/nginx/conf/ssl/tutorialspots.com/tutorialspots.com.crt
 rm -rf /usr/local/nginx/conf/ssl/tutorialspots.com/tutorialspots.com.key
 rm -rf /usr/local/nginx/conf/ssl/tutorialspots.com/tutorialspots.com.csr
 rm -rf /usr/local/nginx/conf/ssl/tutorialspots.com
 rm -rf /home/nginx/domains/tutorialspots.com
 service nginx restart
-------------------------------------------------------------
Note: -s y mean ssl self-signed create.
The below process will automatically create some file for configuration:
- Nginx vhost conf: /usr/local/nginx/conf/conf.d/tutorialspots.com.conf
- Nginx SPDY SSL vhost conf: /usr/local/nginx/conf/conf.d/tutorialspots.com.ssl.conf

Some information:
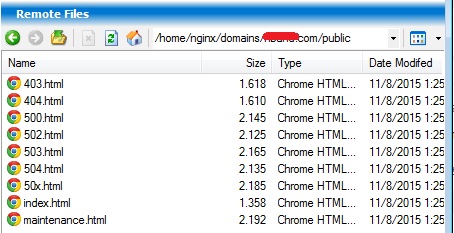
- Vhost public web root: /home/nginx/domains/tutorialspots.com/public
- SSL configure: /usr/local/nginx/conf/ssl_include.conf
- Self-signed SSL Certificate: /usr/local/nginx/conf/ssl/tutorialspots.com/tutorialspots.com.crt
- SSL Private Key: /usr/local/nginx/conf/ssl/tutorialspots.com/nbahd.com.key
- SSL CSR File: /usr/local/nginx/conf/ssl/tutorialspots.com/tutorialspots.com.csr
Method 2:
sh /usr/local/src/centminmod/centmin.sh
Output:
[root@tutorialspots ~]# sh /usr/local/src/centminmod/centmin.sh
--------------------------------------------------------
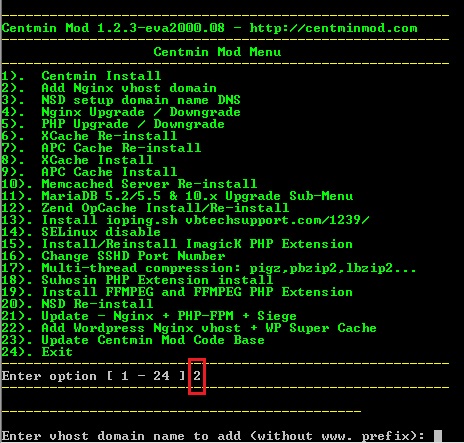
Centmin Mod 1.2.3-eva2000.08 - http://centminmod.com
--------------------------------------------------------
Centmin Mod Menu
--------------------------------------------------------
1). Centmin Install
2). Add Nginx vhost domain
3). NSD setup domain name DNS
4). Nginx Upgrade / Downgrade
5). PHP Upgrade / Downgrade
6). XCache Re-install
7). APC Cache Re-install
8). XCache Install
9). APC Cache Install
10). Memcached Server Re-install
11). MariaDB 5.2/5.5 & 10.x Upgrade Sub-Menu
12). Zend OpCache Install/Re-install
13). Install ioping.sh vbtechsupport.com/1239/
14). SELinux disable
15). Install/Reinstall ImagicK PHP Extension
16). Change SSHD Port Number
17). Multi-thread compression: pigz,pbzip2,lbzip2...
18). Suhosin PHP Extension install
19). Install FFMPEG and FFMPEG PHP Extension
20). NSD Re-install
21). Update - Nginx + PHP-FPM + Siege
22). Add WordPress Nginx vhost + WP Super Cache
23). Update Centmin Mod Code Base
24). Exit
--------------------------------------------------------
Enter option [ 1 - 24 ] 2
--------------------------------------------------------
---------------------------------------------
Enter vhost domain name to add (without www. prefix): tutorialspots.com
Create a self-signed SSL certificate Nginx vhost? [y/n]: y
Create FTP username for vhost domain (enter username): data
Auto generate FTP password (recommended) [y/n]: y
FTP username you entered: tutorialspots
FTP password auto generated: eA92xHBBoOMom5DQ5u2dG
Password:
Enter it again:
---------------------------------------------------------------
SSL Vhost Setup...
---------------------------------------------------------------
---------------------------------------------------------------
Generating self signed SSL certificate...
CSR file can also be used to be submitted for paid SSL certificates
If using for paid SSL certificates be sure to keep both private key and CSR safe
creating CSR File: tutorialspots.com.csr
creating private key: tutorialspots.com.key
creating self-signed SSL certificate: tutorialspots.com.crt
Generating a 2048 bit RSA private key
..................+++
...................................................................+++
writing new private key to 'data.downappz.com.key'
-----
Signature ok
subject=/C=US/ST=California/L=Los Angeles/O=tutorialspots.com/OU=tutorialspots.c
om/CN=tutorialspots.com
Getting Private key
---------------------------------------------------------------
Generating dhparam.pem file - can take a few minutes...
Generating DH parameters, 2048 bit long safe prime, generator 2
This is going to take a long time
Use menu #2 2). Add Nginx vhost domain


1 Comment
Centmin Mod: how to remove Domain/Subdomain Account | Free Online Tutorials
(December 11, 2015 - 1:29 am)[…] In previous tutorial, we learn how to add new Domain/Subdomain Account […]