
Step 1: install postfix
sudo apt update

sudo apt install postfix
root@tutorialspots ~ # sudo apt update
Hit:1 http://mirror.hetzner.com/ubuntu/packages jammy InRelease
Get:2 http://mirror.hetzner.com/ubuntu/packages jammy-updates InRelease [119 kB]
Hit:3 http://mirror.hetzner.com/ubuntu/packages jammy-backports InRelease
Get:4 http://mirror.hetzner.com/ubuntu/packages jammy-security InRelease [110 kB]
Hit:5 http://nginx.org/packages/ubuntu jammy InRelease
Hit:6 http://de.archive.ubuntu.com/ubuntu jammy InRelease
Get:7 http://security.ubuntu.com/ubuntu jammy-security InRelease [110 kB]
Get:8 http://de.archive.ubuntu.com/ubuntu jammy-updates InRelease [119 kB]
Get:9 http://mirror.hetzner.com/ubuntu/packages jammy-updates/main amd64 Packages [1,610 kB]
Hit:10 http://de.archive.ubuntu.com/ubuntu jammy-backports InRelease
Get:11 http://mirror.hetzner.com/ubuntu/packages jammy-updates/universe amd64 Packages [1,071 kB]
Get:12 http://de.archive.ubuntu.com/ubuntu jammy-updates/main amd64 Packages [1,610 kB]
Get:13 http://de.archive.ubuntu.com/ubuntu jammy-updates/universe amd64 Packages [1,071 kB]
Fetched 5,820 kB in 1s (9,681 kB/s)
Reading package lists... Done
Building dependency tree... Done
Reading state information... Done
48 packages can be upgraded. Run 'apt list --upgradable' to see them.
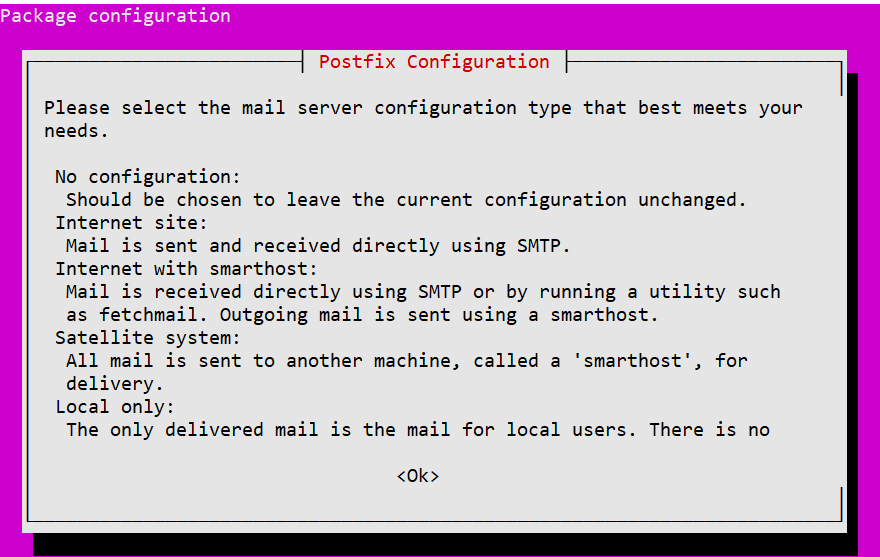
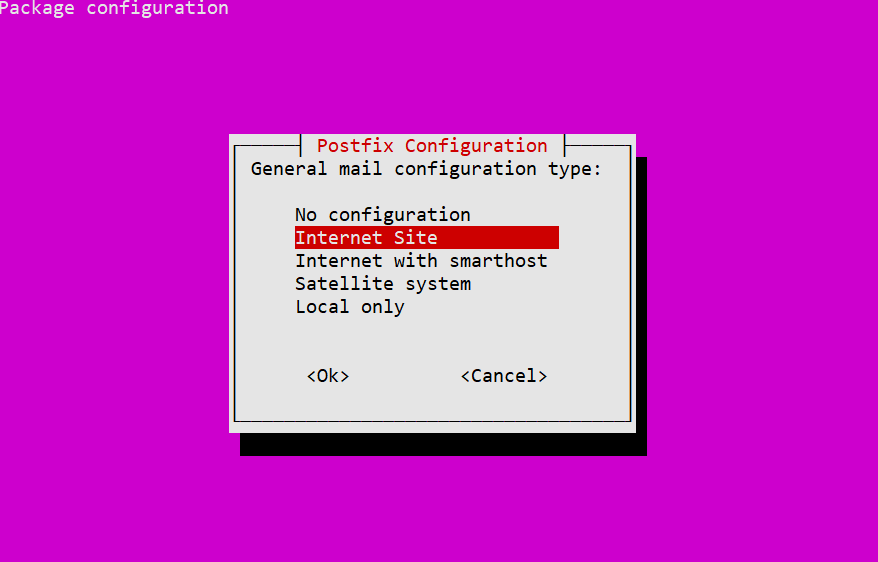
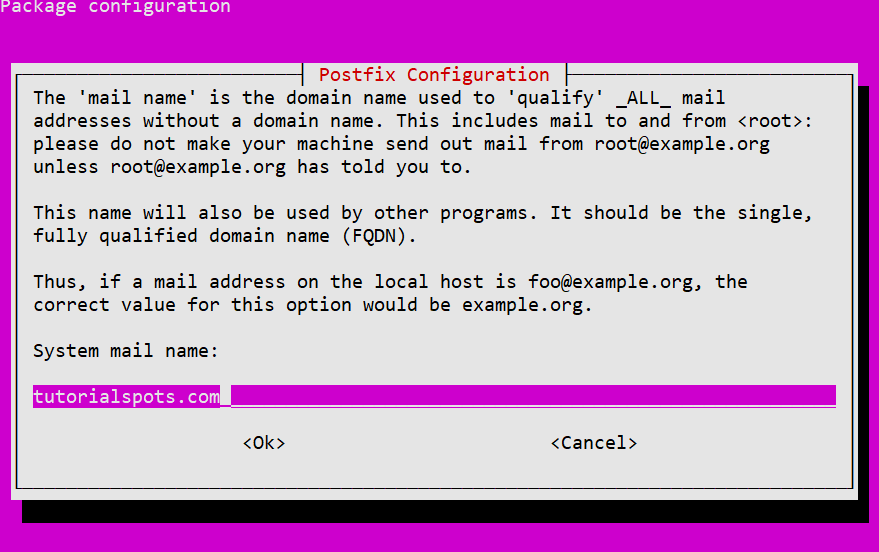
You can re-configure postfix:
sudo dpkg-reconfigure postfix
Step 2:
sudo systemctl enable postfix

sudo systemctl start postfix
Step 3: SPF configuration:
Add SPF Record to DNS :
Log in to your domain’s DNS admin account. Usually through the administration interface of the domain name provider or DNS service you are using.
Add a new TXT record with the following content:
v=spf1 a:mail.yourdomain.com ip4:<server_ip> include:_spf.google.com ~all
example
v=spf1 a:mail.yourdomain.com ip4:11.11.11.11 include:_spf.google.com ~all
Save changes.
read more about SPF: https://support.google.com/a/answer/10685031?sjid=14440567733282704103-AP
Step 4: Install OpenDKIM using the following command:
sudo apt install opendkim opendkim-tools
...
Unpacking libopendkim11:amd64 (2.11.0~beta2-6) ...
Selecting previously unselected package libmemcached11:amd64.
Preparing to unpack .../01-libmemcached11_1.0.18-4.2ubuntu4_amd64.deb ...
Unpacking libmemcached11:amd64 (1.0.18-4.2ubuntu4) ...
Selecting previously unselected package libmilter1.0.1:amd64.
Preparing to unpack .../02-libmilter1.0.1_8.15.2-22ubuntu3_amd64.deb ...
Unpacking libmilter1.0.1:amd64 (8.15.2-22ubuntu3) ...
Selecting previously unselected package libopendbx1.
Preparing to unpack .../03-libopendbx1_1.4.6-16_amd64.deb ...
Unpacking libopendbx1 (1.4.6-16) ...
Selecting previously unselected package librbl1:amd64.
Preparing to unpack .../04-librbl1_2.11.0~beta2-6_amd64.deb ...
Unpacking librbl1:amd64 (2.11.0~beta2-6) ...
Selecting previously unselected package libunbound8:amd64.
Preparing to unpack .../05-libunbound8_1.13.1-1ubuntu5.4_amd64.deb ...
Unpacking libunbound8:amd64 (1.13.1-1ubuntu5.4) ...
Selecting previously unselected package libvbr2:amd64.
Preparing to unpack .../06-libvbr2_2.11.0~beta2-6_amd64.deb ...
Unpacking libvbr2:amd64 (2.11.0~beta2-6) ...
Selecting previously unselected package dns-root-data.
Preparing to unpack .../07-dns-root-data_2023112702~ubuntu0.22.04.1_all.deb ...
Unpacking dns-root-data (2023112702~ubuntu0.22.04.1) ...
Selecting previously unselected package opendkim.
Preparing to unpack .../08-opendkim_2.11.0~beta2-6_amd64.deb ...
Unpacking opendkim (2.11.0~beta2-6) ...
Selecting previously unselected package libopendbx1-sqlite3.
Preparing to unpack .../09-libopendbx1-sqlite3_1.4.6-16_amd64.deb ...
Unpacking libopendbx1-sqlite3 (1.4.6-16) ...
Selecting previously unselected package opendkim-tools.
Preparing to unpack .../10-opendkim-tools_2.11.0~beta2-6_amd64.deb ...
Unpacking opendkim-tools (2.11.0~beta2-6) ...
Setting up libopendkim11:amd64 (2.11.0~beta2-6) ...
Setting up libopendbx1 (1.4.6-16) ...
Setting up dns-root-data (2023112702~ubuntu0.22.04.1) ...
Setting up libunbound8:amd64 (1.13.1-1ubuntu5.4) ...
Setting up libmilter1.0.1:amd64 (8.15.2-22ubuntu3) ...
Setting up libmemcached11:amd64 (1.0.18-4.2ubuntu4) ...
Setting up librbl1:amd64 (2.11.0~beta2-6) ...
Setting up libvbr2:amd64 (2.11.0~beta2-6) ...
Setting up libopendbx1-sqlite3 (1.4.6-16) ...
Setting up opendkim-tools (2.11.0~beta2-6) ...
Setting up opendkim (2.11.0~beta2-6) ...
Created symlink /etc/systemd/system/multi-user.target.wants/opendkim.service → /lib/systemd/system/opendkim.service.
Processing triggers for man-db (2.10.2-1) ...
Processing triggers for libc-bin (2.35-0ubuntu3.7) ...
Scanning processes...
Scanning processor microcode...
Scanning linux images...

Running kernel seems to be up-to-date.

The processor microcode seems to be up-to-date.

No services need to be restarted.

No containers need to be restarted.

No user sessions are running outdated binaries.

No VM guests are running outdated hypervisor (qemu) binaries on this host.
Step 5: Generate a key pair for DKIM with the following command:
sudo opendkim-genkey -t -s <selector> -d <your_domain>
Replace
<selector>
with a name of your choice (eg:postmaster) and
If you want to use email admin@yourdomain.com you use
<selector>
is admin
This command will create two files:
<selector>.private
and
<selector>.txt
Step 6: create OpenDKIM’s key directory: /etc/opendkim/keys/
mkdir -p /etc/opendkim/keys/<your_domain>
Step 7: Move the private key into OpenDKIM’s key directory:
sudo mv <selector>.private /etc/opendkim/keys/<your_domain>/<selector>.private
Step 8: Specify ownership for the lock file
sudo chown opendkim:opendkim /etc/opendkim/keys/<your_domain>/<selector>.private
sudo chown opendkim:opendkim /etc/opendkim/keys/tutorialspots.com/postmaster.private
Step 9: Edit OpenDKIM’s configuration file /etc/opendkim.conf
uncomment then change default:
#Domain                 example.com
#Selector               2020
#KeyFile                /etc/dkimkeys/example.private
To:
Domain                  <your_domain>
Selector                <selector>
KeyFile                 /etc/opendkim/keys/<your_domain>/<selector>.private
Step 10: edit file /etc/default/opendkim
you will see
# default:
SOCKET=local:$RUNDIR/opendkim.sock
# listen on all interfaces on port 54321:
#SOCKET=inet:54321
# listen on loopback on port 12345:
#SOCKET=inet:12345@localhost
# listen on 192.0.2.1 on port 12345:
#SOCKET=inet:12345@192.0.2.1
change to
# default:
#SOCKET=local:$RUNDIR/opendkim.sock
# listen on all interfaces on port 54321:
#SOCKET=inet:54321
# listen on loopback on port 12345:
SOCKET="inet:8891@localhost"
# listen on 192.0.2.1 on port 12345:
#SOCKET=inet:12345@192.0.2.1
Step 11: Restart the OpenDKIM service
sudo systemctl restart opendkim
Step 12: Add DKIM Records to DNS :
open file
<selector>.txt
Example:
cat postmaster.txt
You will see content like:
postmaster._domainkey   IN      TXT     ( "v=DKIM1; h=sha256; k=rsa; t=y; "
          "p=MIIBIjANBgkqhkiG9w0BAQEFAAOCAQ8AMIIBCgKCAQEAjz0DntbdxG6wc3BbxidEQMLB3NOUq/0zZe6a8hwLjNuRUNngtk2pFLxKhzXrwud9lfVZdts/tvQ0p/eWpi5VsKeaJf9eE/Vm00doL4lg+U7AWwWw/kSsa8H9k/wlS5LQzKNol33ysjFEtTD/K12KzNPmfGB0R727yaocA4SvKMz2iShzu8uwKiREIR7bLLxXtLKVHlI4zdLEIy"
          "kCcy8NZ16mMTZ7qXqmPabXmjY4+aeIhFXf8b87ELPmG7zZwvdyfFg82c7hmNN8MFgTGBLu52QWb3umvAvmZRDrSET+it4sfPH1ikPdRBBCa0l7AUyUmIBzM0XXtVvC1iHCMXL7YQIDAQAB" )  ; ----- DKIM key postmaster for yourdomain.com
you only need to copy parts
p=<public_key>
of the recording.
p=MIIBIjANBgkqhkiG9w0BAQEFAAOCAQ8AMIIBCgKCAQEAjz0DntbdxG6wc3BbxidEQMLB3NOUq/0zZe6a8hwLjNuRUNngtk2pFLxKhzXrwud9lfVZdts/tvQ0p/eWpi5VsKeaJf9eE/Vm00doL5lg+U7AWwWw/kSsa8H9k/wlS4LQzKNol33ysjFEtTD/K12KzNPmfGB0R727yaocA4SvKMz2iShzu8uwKiREIR7bLLxXtLKVHlI4zdLEIykCcy8NZ16mMTZ7qXqmPabXmjY4+aeIhFXf8b87ELPmG7zZwvdyfFg82c7hmNN8MFgTGBLu52QWb3umvAvmZRDrSET+it4sfPH1ikPdRBBCa0l7AUyUmIBzM0XXtVvC1iHCMXL7YQIDAQAB
Add TXT record postmaster._domainkey
Step 13: Configure Postfix to use DKIM:
Postfix configuration :
Edit Postfix’s configuration file /etc/postfix/main.cf
add theses lines
smtpd_milters = inet:localhost:8891
non_smtpd_milters = inet:localhost:8891
milter_default_action = accept
milter_protocol = 6
and edit line:
inet_protocols = all
to:
inet_protocols = ipv4
Step 14: Restart Postfix and OpenDKIM :
Restart Postfix:
sudo systemctl restart postfix
Restart OpenDKIM:
sudo systemctl restart opendkim
Verify SMTP server:
root@tutorialspots ~ # telnet 127.0.0.1 25
Trying 127.0.0.1...
Connected to 127.0.0.1.
Escape character is '^]'.
220 Ubuntu-2204-jammy-amd64-base ESMTP Postfix (Ubuntu)
Test:
apt install mailutils
echo "Test mail from Postfix" | mail -s "Test Postfix" -a "From: postmaster@yourdomain.com" youremail@gmail.com
check log:
tail /var/log/mail.log -n 200
How to change SMTP port?
edit file /etc/postfix/master.cf
nano /etc/postfix/master.cf
3 important lines:
smtp      inet  n       -       y       -       -       smtpd
submission inet n       -       y       -       -       smtpd
smtps     inet  n       -       y       -       -       smtpd
You use only one line, smtp for port 25, submission for port 587, smtps for port 465
after edit file, restart service postfix
service postfix restart