I. Install Gnome 3 desktop
Step 1:
sudo apt install ubuntu-gnome-desktop
...
Setting up gnome-session (3.36.0-2ubuntu1) ...
Setting up tracker-extract (2.3.3-2) ...
Created symlink /etc/systemd/user/default.target.wants/tracker-extract.service → /usr/lib/systemd/user/tracker-extract.service.
Setting up tracker-miner-fs (2.3.3-2) ...
Created symlink /etc/systemd/user/default.target.wants/tracker-miner-fs.service → /usr/lib/systemd/user/tracker-miner-fs.service.
Setting up libcheese-gtk25:amd64 (3.34.0-1ubuntu1) ...
Setting up nautilus (1:3.36.3-0ubuntu1.20.04.1) ...
Setting up gnome-control-center (1:3.36.5-0ubuntu4) ...
Setting up gnome-shell-extension-desktop-icons (20.04.0-3~ubuntu20.04.6) ...
Setting up ubuntu-desktop-minimal (1.450.2) ...
Setting up ubuntu-desktop (1.450.2) ...
Setting up ubuntu-gnome-desktop (0.87) ...
Processing triggers for initramfs-tools (0.136ubuntu6.7) ...
update-initramfs: Generating /boot/initrd.img-5.13.0-41-generic
I: The initramfs will attempt to resume from /dev/md0
I: (UUID=c4cd7f36-075f-4584-8282-db9486328d73)
I: Set the RESUME variable to override this.
Processing triggers for dbus (1.12.16-2ubuntu2.2) ...
Processing triggers for systemd (245.4-4ubuntu3.17) ...
Processing triggers for libc-bin (2.31-0ubuntu9.9) ...
Step 2:
sudo systemctl enable gdm3
sudo systemctl start gdm3
II. TigerVNC server
Step 1: apt install tigervnc-standalone-server
root@tutorialspots ~ # apt install tigervnc-standalone-server
Reading package lists... Done
Building dependency tree
Need to get 1,028 kB of archives.
After this operation, 2,856 kB of additional disk space will be used.
Do you want to continue? [Y/n]
Get:1 http://de.archive.ubuntu.com/ubuntu focal/universe amd64 libfile-readbackwards-perl all 1.05-2 [10.8 kB]
Get:2 http://de.archive.ubuntu.com/ubuntu focal/universe amd64 tigervnc-standalone-server amd64 1.10.1+dfsg-3 [1,017 kB]
Fetched 1,028 kB in 0s (5,341 kB/s)
Selecting previously unselected package libfile-readbackwards-perl.
(Reading database ... 99102 files and directories currently installed.)
Preparing to unpack .../libfile-readbackwards-perl_1.05-2_all.deb ...
Unpacking libfile-readbackwards-perl (1.05-2) ...
Selecting previously unselected package tigervnc-standalone-server.
Preparing to unpack .../tigervnc-standalone-server_1.10.1+dfsg-3_amd64.deb ...
Unpacking tigervnc-standalone-server (1.10.1+dfsg-3) ...
Setting up libfile-readbackwards-perl (1.05-2) ...
Setting up tigervnc-standalone-server (1.10.1+dfsg-3) ...
update-alternatives: using /usr/bin/tigervncserver to provide /usr/bin/vncserver (vncserver) in auto mode
update-alternatives: using /usr/bin/Xtigervnc to provide /usr/bin/Xvnc (Xvnc) in auto mode
Processing triggers for man-db (2.9.1-1) ...
Step 2: sudo apt-get install tigervnc-common
root@tutorialspots ~ # sudo apt-get install tigervnc-common
Reading package lists... Done
Building dependency tree
Reading state information... Done
The following NEW packages will be installed:
  tigervnc-common
0 upgraded, 1 newly installed, 0 to remove and 4 not upgraded.
Need to get 69.0 kB of archives.
After this operation, 232 kB of additional disk space will be used.
Get:1 http://de.archive.ubuntu.com/ubuntu focal/universe amd64 tigervnc-common amd64 1.10.1+dfsg-3 [69.0 kB]
Fetched 69.0 kB in 0s (729 kB/s)
Selecting previously unselected package tigervnc-common.
(Reading database ... 99120 files and directories currently installed.)
Preparing to unpack .../tigervnc-common_1.10.1+dfsg-3_amd64.deb ...
Unpacking tigervnc-common (1.10.1+dfsg-3) ...
Setting up tigervnc-common (1.10.1+dfsg-3) ...
update-alternatives: using /usr/bin/tigervncconfig to provide /usr/bin/vncconfig (vncconfig) in auto mode
update-alternatives: using /usr/bin/tigervncpasswd to provide /usr/bin/vncpasswd (vncpasswd) in auto mode
Processing triggers for man-db (2.9.1-1) ...
Step 3: login with non-root user then run vncserver -depth 32 -geometry 1680x1050
root@tutorialspots ~ # su - tutorialspots
$ vncserver -depth 32 -geometry 1680x1050

New 'Ubuntu-2004-focal-64-minimal-hwe:3 (tutorialspots)' desktop at :3 on machine Ubuntu-2004-focal-64-minimal-hwe

Starting applications specified in /home/tutorialspots/.vnc/xstartup
Log file is /home/tutorialspots/.vnc/Ubuntu-2004-focal-64-minimal-hwe:3.log

Use xtigervncviewer -SecurityTypes VncAuth -passwd /home/tutorialspots/.vnc/passwd :3 to connect to the VNC server.
Step 4: login with non-root user then edit file ~/.vnc/xstartup
Content:
#!/bin/sh
# Start Gnome 3 Desktop
[ -x /etc/vnc/xstartup ] && exec /etc/vnc/xstartup
[ -r $HOME/.Xresources ] && xrdb $HOME/.Xresources
vncconfig -iconic &
dbus-launch --exit-with-session gnome-session &
Step 5: check list vncserver -list
root@tutorialspots ~ # vncserver -list

TigerVNC server sessions:

X DISPLAY #     RFB PORT #      PROCESS ID
:2              5902            159390
You see port 5902
III. Connect to VNC server
Step 1: Set Up SSH Tunneling for more security
ssh -L 5902:127.0.0.1:5902 -N -f -l tutorialspots ipserver
Example for Windows (Cygwin):
tutorialspots@tutorialspots ~
$ ssh -L 5902:127.0.0.1:5902 -N -f -l tutorialspots 46.4.108.111
tutorialspots@46.4.108.111's password:
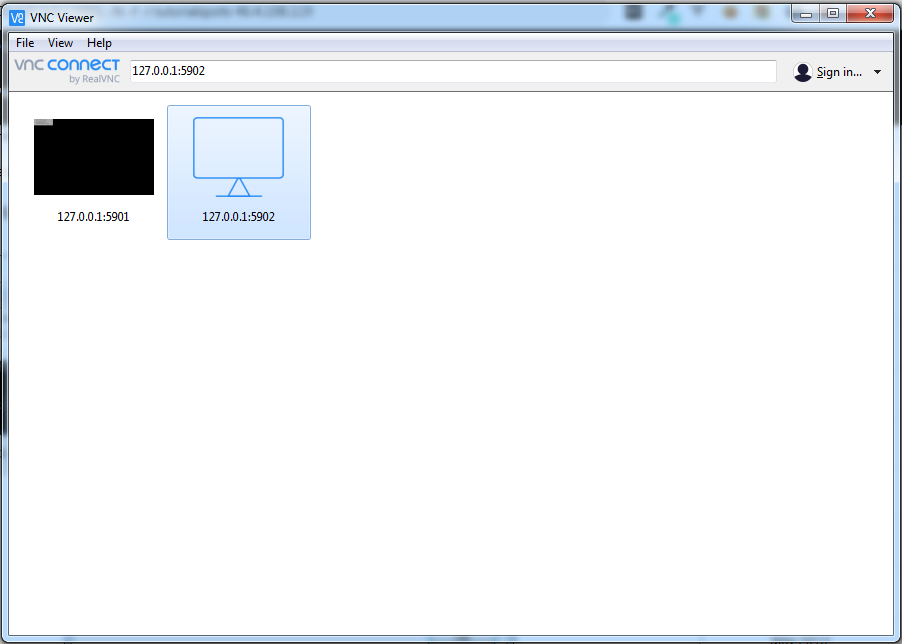
Step 2: Connecting using Real Vncviewer