Mapping an Array to Elements with v-for
We can use the v-for directive to render a list of items based on an array. The v-for directive requires a special syntax in the form of city in cities, where cities is the source data array and item is an alias for the array element being iterated on:
Example 1:
App.vue
<template>
  <div id="app">
    <img alt="Vue logo" src="./assets/logo.png">

    <ul>
      <li v-for="city in cities" :key="city.id">
        {{ city.name }}
      </li>
    </ul>

  </div>
</template>

<script lang="ts">
import { Vue } from 'vue-class-component'

export default class App extends Vue
{
  cities = [
    {id:1,name:'Hanoi'},
    {id:2,name:'Bangkok'},
    {id:3,name:'Jakarta'}
  ]
}

</script>

<style>
#app {
  font-family: Avenir, Helvetica, Arial, sans-serif;
  -webkit-font-smoothing: antialiased;
  -moz-osx-font-smoothing: grayscale;
  text-align: center;
  color: #2c3e50;
  margin-top: 60px;
}
#app ul{
  list-style: none;
  padding-inline-start: 0px;
}
</style>

Inside v-for blocks we have full access to parent scope properties. v-for also supports an optional second argument for the index of the current item.
Example 2:
App.vue
<template>
  <div id="app">
    <img alt="Vue logo" src="./assets/logo.png">

    <ul>
      <li v-for="(city, index) in cities" :key="city.id">
        {{ index }} - {{ city.name }}
      </li>
    </ul>

  </div>
</template>

...
Result:
0 - Hanoi
1 - Bangkok
2 - Jakarta
You can also use of as the delimiter instead of in, so that it is closer to JavaScript’s syntax for iterators:
<li v-for="(city, index) of cities" :key="city.id">
or
<li v-for="city of cities" :key="city.id">
v-for with an Object
You can also use v-for to iterate through the properties of an object.
    <ul>
      <li v-for="value in myObject" :key="value">
        {{ value }}
      </li>
    </ul>
  myObject = {
    id: 1,
    name: 'Peter',
    age: 34,
    job: 'engineer',
    city: 'Newyork'
  }
Result:
1
Peter
34
engineer
Newyork
You can also provide a second argument for the property’s name (a.k.a. key):
    <ul>
      <li v-for="(value, key) in myObject" :key="value">
        {{ key }} : {{ value }}
      </li>
    </ul>
Result:
id : 1
name : Peter
age : 34
job : engineer
city : Newyork
And another for the index:
    <ul>
      <li v-for="(value, key, index) in myObject" :key="value">
        {{ index }} - {{ key }} : {{ value }}
      </li>
    </ul>
Result:
0 - id : 1
1 - name : Peter
2 - age : 34
3 - job : engineer
4 - city : Newyork
Note
When iterating over an object, the order is based on the enumeration order of Object.keys(), which isn’t guaranteed to be consistent across JavaScript engine implementations.
Maintaining State
When Vue is updating a list of elements rendered with v-for, by default it uses an “in-place patch” strategy. If the order of the data items has changed, instead of moving the DOM elements to match the order of the items, Vue will patch each element in-place and make sure it reflects what should be rendered at that particular index.
This default mode is efficient, but only suitable when your list render output does not rely on child component state or temporary DOM state (e.g. form input values).
To give Vue a hint so that it can track each node’s identity, and thus reuse and reorder existing elements, you need to provide a unique key attribute for each item:
<div v-for="city in cities" :key="city.id">
  <!-- content -->
</div>
It is recommended to provide a key attribute with v-for whenever possible, unless the iterated DOM content is simple, or you are intentionally relying on the default behavior for performance gains.
Since it’s a generic mechanism for Vue to identify nodes, the key also has other uses that are not specifically tied to v-for, as we will see later in the guide.
Note
Don’t use non-primitive values like objects and arrays as v-for keys. Use string or numeric values instead.
For detailed usage of the key attribute, please see the key API documentation.
Array Change Detection
Mutation Methods
Vue wraps an observed array’s mutation methods so they will also trigger view updates. The wrapped methods are:
- push()
- pop()
- shift()
- unshift()
- splice()
- sort()
- reverse()
You can open the console and play with the previous examples’ cities array by calling their mutation methods. For example: vm.cities.push({ id: 4, name: 'Newyork' }).
Replacing an Array
Mutation methods, as the name suggests, mutate the original array they are called on. In comparison, there are also non-mutating methods, e.g. filter(), concat() and slice(), which do not mutate the original array but always return a new array. When working with non-mutating methods, you can replace the old array with the new one:
vm.items = vm.items.filter(item => item.message.match(/blah/))
You might think this will cause Vue to throw away the existing DOM and re-render the entire list – luckily, that is not the case. Vue implements some smart heuristics to maximize DOM element reuse, so replacing an array with another array containing overlapping objects is a very efficient operation, base on :key directive.
Displaying Filtered/Sorted Results
Sometimes we want to display a filtered or sorted version of an array without actually mutating or resetting the original data. In this case, you can create a computed property that returns the filtered or sorted array.
For example:
<li v-for="n in evenNumbers">{{ n }}</li>
data() {
  return {
    numbers: [ 1, 2, 3, 4, 5 ]
  }
},
computed: {
  evenNumbers() {
    return this.numbers.filter(number => number % 2 === 0)
  }
}
In situations where computed properties are not feasible (e.g. inside nested v-for loops), you can use a method:
<ul v-for="numbers in sets">
  <li v-for="n in even(numbers)">{{ n }}</li>
</ul>
data() {
  return {
    sets: [[ 1, 2, 3, 4, 5 ], [6, 7, 8, 9, 10]]
  }
},
methods: {
  even(numbers) {
    return numbers.filter(number => number % 2 === 0)
  }
}
v-for with a Range
v-for can also take an integer. In this case it will repeat the template that many times.
<div id="range" class="demo">
  <span v-for="n in 5">{{ n }}</span>
</div>
v-for on a <template>
Similar to template v-if, you can also use a <template> tag with v-for to render a block of multiple elements. For example:
<ul>
  <template v-for="item in items">
    <li>{{ item.msg }}</li>
    <li class="divider" role="presentation"></li>
  </template>
</ul>
v-for with v-if
Note: that it’s not recommended to use v-if and v-for together. Refer to style guide for details.
When they exist on the same node, v-for has a higher priority than v-if. That means the v-if will be run on each iteration of the loop separately. This can be useful when you want to render nodes for only some items, like below:
<li v-for="todo in todos" v-if="!todo.isComplete">
  {{ todo }}
</li>
The above only renders the todos that are not complete.
If instead, your intent is to conditionally skip execution of the loop, you can place the v-if on a wrapper element (or <template>). For example:
<ul v-if="todos.length">
  <li v-for="todo in todos">
    {{ todo }}
  </li>
</ul>
<p v-else>No todos left!</p>
v-for with a Component
You can directly use v-for on a custom component, like any normal element:
<my-component v-for="item in items" :key="item.id"></my-component>
However, this won’t automatically pass any data to the component, because components have isolated scopes of their own. In order to pass the iterated data into the component, we should also use props (prop is any exists attribute):
<my-component
  v-for="(item, index) in items"
  :item="item"
  :index="index"
  :key="item.id"
></my-component>
The reason for not automatically injecting item into the component is because that makes the component tightly coupled to how v-for works. Being explicit about where its data comes from makes the component reusable in other situations.
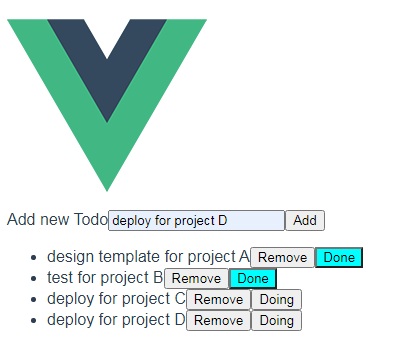
Here’s a complete example of a simple todo list:
App.vue
<template>
  <div id="app">
    <img alt="Vue logo" src="./assets/logo.png">

    <form @submit.prevent="doAddTodo">
      <label for="todoTitle">Add new Todo</label>
      <input type="text" id="todoTitle" v-model="newtodoTitle" />
      <input type="submit" value="Add" />
    </form>
    <ul>
      <todo
        v-for="(item,index) in todos"
        :key="item.id"
        :item="item"
        @remove="todos.splice(index,1)"
      >
      </todo>
    </ul>

  </div>
</template>

<script lang="ts">
import { Vue , Options } from 'vue-class-component'

import todo from './components/todo.vue'

@Options({
  components: {
    todo
  },
})
export default class App extends Vue
{
  todos = [
    {id:1,title:"design template for project A",done:true},
    {id:2,title:"test for project B",done:false},
    {id:3,title:"deploy for project C",done:false},
  ]
  newtodoTitle = ""
  incrementId = 4
  doAddTodo(){
    let aTodo = {
      id:this.incrementId++,
      title:this.newtodoTitle,
      done:false
    }
    this.todos.push(aTodo)
  }
}

</script>

<style>
#app {
  font-family: Avenir, Helvetica, Arial, sans-serif;
  -webkit-font-smoothing: antialiased;
  -moz-osx-font-smoothing: grayscale;
  color: #2c3e50;
  margin-top: 60px;
}
#app ul{
  text-align: left;
}
.done{
  background-color: aqua;
}
</style>
./components/todo.vue
<template>
    <li>
        <span>{{ item.title }}</span>
        <button @click="$emit('remove')">Remove</button>
        <button @click="changeDone()" :class="{ done : item.done }">{{ item.done ? 'Done': 'Doing' }}</button>
    </li>
</template>

<script lang="ts">
import { Options, Vue } from 'vue-class-component';

@Options({
  props: {
    item: {}
  }
})
export default class todo extends Vue {
  item: {done:boolean}
  changeDone(){
    this.item.done = !this.item.done
  }
}
</script>